写前哔哔
老早就看到别人用Github Actions来实现Hexo自动化部署,但是看见一长串教程就退缩了,正好趁着休假抄一下店长的作业。
Hexo自动化部署 By Github Actions
想当初挡住我的第一步就是上传仓库,各种git搞得我眼花缭乱,后来才知道Github官方还有个图形化应用程序Github Desktop可以极大简化操作:
- 首先在本地电脑上新创建一个用于存放博客源码的文件夹(我的文件夹名是
blog_source),然后将博客根目录(我的是blog)下的所有文件复制粘贴到blog_source中。
- 打开
[Blogroot]/.gitignore,输入以下内容:
1
2
3
4
5
6
7
8
9
10
| .DS_Store
Thumbs.db
db.json
*.log
node_modules/
public/
.deploy*/
.deploy_git*/
.idea
themes/butterfly/.git
|
最好把butterfly目录下的.git文件夹删除,这是因为[Blogroot]/themes/butterfly 本身是一个独立的 Git 仓库(里面包含 .git 文件夹),所以 Git 会把它识别为 “嵌入式仓库”,而不是普通文件目录,直接 git add 无法正常跟踪其内容。
- 在
[Blogroot] 新建 .github 文件夹,注意开头是有个 . 的。然后在 .github 内新建 workflows 文件夹,再在 workflows 文件夹内新建 autodeploy.yml,在 [Blogroot]/.github/workflows/autodeploy.yml 里面输入:
1
2
3
4
5
6
7
8
9
10
11
12
13
14
15
16
17
18
19
20
21
22
23
24
25
26
27
28
29
30
31
32
33
34
35
36
37
38
39
40
41
42
43
44
45
46
47
48
49
50
51
52
53
54
55
56
57
58
|
name: 自动部署
on:
push:
branches:
- main
release:
types:
- published
jobs:
deploy:
runs-on: ubuntu-latest
steps:
- name: 检查分支
uses: actions/checkout@v2
with:
ref: main
- name: 安装 Node
uses: actions/setup-node@v1
with:
node-version: "24.x"
- name: 安装 Hexo
run: |
export TZ='Asia/Shanghai'
npm install hexo-cli -g
- name: 缓存 Hexo
uses: actions/cache@v4
id: cache
with:
path: node_modules
key: ${{runner.OS}}-${{hashFiles('**/package-lock.json')}}
- name: 安装依赖
if: steps.cache.outputs.cache-hit != 'true'
run: |
npm install --save
- name: 生成静态文件
run: |
hexo clean
hexo generate
- name: 部署
run: |
cd ./public
git init
git config --global user.name '${{ secrets.GITHUBUSERNAME }}'
git config --global user.email '${{ secrets.GITHUBEMAIL }}'
git add .
git commit -m "${{ github.event.head_commit.message }} $(date +"%Z %Y-%m-%d %A %H:%M:%S") Updated By Github Actions"
git push --force --quiet "https://${{ secrets.GITHUBUSERNAME }}:${{ secrets.GITHUBTOKEN }}@github.com/${{ secrets.GITHUBUSERNAME }}/${{ secrets.GITHUBUSERNAME }}.github.io.git" master:master
#git push --force --quiet "https://${{ secrets.GITHUBUSERNAME }}:${{ secrets.GITHUBTOKEN }}@github.com/${{ secrets.GITHUBUSERNAME }}/仓库名.git" master:main
|
需要注意的主要有三点:
一是要保证uses: actions/cache@v4,因为GitHub Actions 工作流中使用了已被废弃的 actions/cache@v1 版本,GitHub 已不再支持该版本,需要更新到 v3 或 v4 版本。
二是如果新仓库,那么分支应该都是main,但是最后一行的分支为master:main,而不是main:main。
三是如果博客部署的仓库不是Github Pages所在的仓库的话,如仓库名.github.io,那么最后一行应该修改为git push --force --quiet "https://${{ secrets.GITHUBUSERNAME }}:secrets.GITHUBUSERNAME:${{ secrets.GITHUBTOKEN }}@github.com/${{ secrets.GITHUBUSERNAME }}/仓库名.git" master:main
- 参照以下视频利用Github Desktop上传博客源码至Github仓库:
在Github Actions中添加EdgeOne自动化刷新
在之前一篇教程中实现了在本地端用Hexo 的deployAfter钩子触发EdgeOne自动化刷新,但这种方法貌似在Actions中不起作用,于是大法启动。
- 在
scripts文件夹中新建edgeone-cache-actions.js,然后复制粘贴以下代码:
1
2
3
4
5
6
7
8
9
10
11
12
13
14
15
16
17
18
19
20
21
22
23
24
25
26
27
28
29
30
31
32
33
34
35
36
37
38
39
40
41
42
43
44
45
46
47
48
49
50
51
52
53
54
55
56
57
58
59
60
61
62
63
64
65
66
67
68
69
70
71
72
73
74
75
76
77
78
79
80
81
82
83
84
85
86
87
88
89
90
91
92
93
94
95
96
97
98
99
100
| const tencentcloud = require("tencentcloud-sdk-nodejs-teo");
const TeoClient = tencentcloud.teo.v20220901.Client;
if (require.main === module) {
main().catch(err => {
console.error("执行失败:", err);
process.exit(1);
});
} else {
console.log("[EdgeOne] 脚本被Hexo加载,跳过执行(仅手动执行生效)");
}
async function main() {
const edgeoneCfg = {
enable: process.env.EDGEONE_ENABLE === 'true',
secretId: process.env.EDGEONE_SECRET_ID,
secretKey: process.env.EDGEONE_SECRET_KEY,
zoneId: process.env.EDGEONE_ZONE_ID,
region: process.env.EDGEONE_REGION || 'ap-guangzhou',
type: process.env.EDGEONE_TYPE || 'purge_host',
targets: process.env.EDGEONE_TARGETS ? process.env.EDGEONE_TARGETS.split(',') : [],
method: process.env.EDGEONE_METHOD || 'invalidate',
retry: process.env.EDGEONE_RETRY ? parseInt(process.env.EDGEONE_RETRY) : 2,
};
console.log("[EdgeOne] 环境变量检测:", {
enable: edgeoneCfg.enable,
hasSecretId: !!edgeoneCfg.secretId,
hasZoneId: !!edgeoneCfg.zoneId
});
if (!edgeoneCfg.enable) {
console.log("[EdgeOne] 缓存刷新已禁用(EDGEONE_ENABLE != 'true')");
process.exit(0);
}
const requiredFields = ['secretId', 'secretKey', 'zoneId'];
const missingFields = requiredFields.filter(field => !edgeoneCfg[field]);
if (missingFields.length > 0) {
console.error(`[EdgeOne] 配置错误:缺少必填参数 ${missingFields.join(', ')}`);
process.exit(1);
}
const client = new TeoClient({
credential: {
secretId: edgeoneCfg.secretId,
secretKey: edgeoneCfg.secretKey,
},
region: edgeoneCfg.region,
profile: { httpProfile: { endpoint: "teo.tencentcloudapi.com" } },
});
await refreshCacheWithRetry(client, edgeoneCfg, edgeoneCfg.retry);
}
async function refreshCacheWithRetry(client, config, retryLeft) {
try {
const params = {
ZoneId: config.zoneId,
Type: config.type,
Targets: config.targets,
Method: config.method,
};
const res = await client.CreatePurgeTask(params);
if (!res || !res.JobId) {
throw new Error(`无效响应: 缺少JobId | ${JSON.stringify(res)}`);
}
if (res.FailedList && res.FailedList.length > 0) {
throw new Error(`部分目标刷新失败: ${JSON.stringify(res.FailedList)}`);
}
console.log(`✅ EdgeOne 刷新成功 | 任务 JobId:${res.JobId}`);
console.log(`→ 类型:${params.Type} | 方式:${params.Method}`);
console.log(`→ 目标:${JSON.stringify(params.Targets)}`);
return true;
} catch (err) {
if (retryLeft > 0) {
console.log(`⚠️ 刷新失败(剩余重试 ${retryLeft} 次):${err.message}`);
return refreshCacheWithRetry(client, config, retryLeft - 1);
} else {
console.error(`❌ 最终刷新失败:${err.message}`);
process.exit(1);
}
}
}
|
1
2
3
4
5
6
7
8
9
10
11
12
13
| - name: 刷新EdgeOne缓存
if: success()
env:
EDGEONE_ENABLE: 'true'
EDGEONE_SECRET_ID: ${{ secrets.EDGEONE_SECRET_ID }}
EDGEONE_SECRET_KEY: ${{ secrets.EDGEONE_SECRET_KEY }}
EDGEONE_ZONE_ID: ${{ secrets.EDGEONE_ZONE_ID }}
EDGEONE_REGION: 'ap-guangzhou'
EDGEONE_TYPE: 'purge_host'
EDGEONE_TARGETS: 'www.sunboy.ltd,image.sunboy.ltd'
EDGEONE_METHOD: 'invalidate'
run: |
node ./scripts/edgeone-cache-actions.js
|
具体获取方法见:
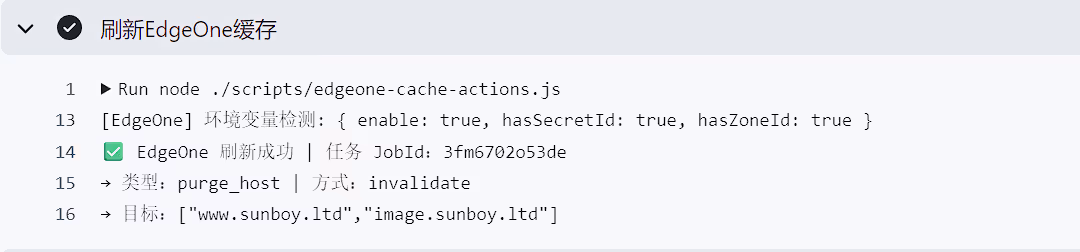
- 最后在Actions处查看
deploy流程,如果显示以下内容说明EdegeOne缓存刷新成功:

最后叨叨
个人纯小白,全程豆包编码,仅做个人成功案例分享,大佬勿喷。